"Speed for the Need" - a mod-package increasing print-accuracy on the Cetus

Well folks, no matter how I look at the progress of my batch-of-mods publishing will take me a ton-of-time to complete, and if you’ve been following my story Cetus Fan Shroud with Wind Door , you already know that I don’t have much productive-time each day. Some days are tougher to get through which further reduce the productive time my pain-riddled body allows.

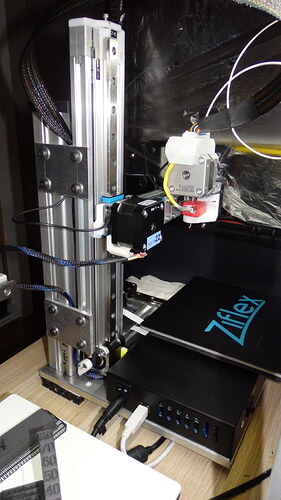
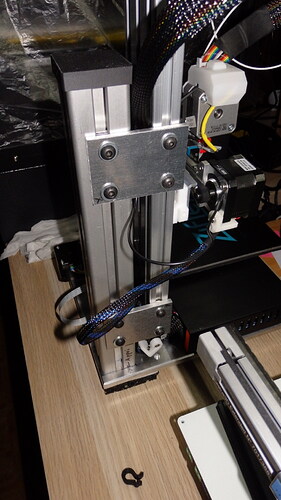
So I have two major mods, one being the z-axis stiffener…and it’s robust folks…z wobble is pretty-much gone…and for the extended versions it’ll be like you now have a backbone. The other major mod is for the extruder assembly, this is where the rubber-hits-the-pavement for accuracy improvements. When I installed the extruder mods it was like the prints suddenly came into focus.

The rest of the mods may seem insignificant, and when used individually the benefits are reduced. It’s the compounding effect when all are used in concert, It’s the sum of these mods where significant increases in accuracy are realized, and the increase in available print-speed is incredulous to watch.

Many of the mods are still in a prototype quality, and then there’s documentation, instructions, 3D CAD cleanup and stl file generation, 3D CAD creation of machined parts and 2D drawings, request-for-quotations on machined parts…just a tad overwhelming for one guy.

The other setback I have, and this may seem ugly to some… I’m desperate for a better quality of life and would love some financial compensation to help me continue this journey of product development.

I’m reaching out to you…the Cetus 3D-printer community …any ideas of how to get this mod-package done and in your hands? So much to do and so little time for one disabled guy. Didn’t I see this coming, so much work to completion… of course I did…but that didn’t matter, because the time I spent in dream-mode melted the pain away.

2 Likes

Yeah, it was probably a good time to start off a new thread :slight_smile:

It’s perfectly fine if you decide to monetise your work! From all your reports, you put a lot of effort into the mods and there is still a major work load waiting to be tackled. So by all means, go for it. You could sell it as a digital package via a Shopify shop or sth. similar. There are likely even less involved ecommerce solutions for a limited catalogue with no inventory. Alternatively you could sell it directly via PayPal for example and send it via email. Or publish it on your website in the open and allow for donations (again PayPal makes this easy).The risk of digital goods leaking will always be there and sometimes people find back to the good path later, a donation model will allow for that. But surely it requires a bit of a leap of faith, I get that. Another or an additional way would be to look into sth like Patreon https://www.patreon.com

Besides compensation for your work, is there any help you require or ask for?

Cheers,

Andreas

I really appreciate your thoughts @superhans , thank-you for taking the time to help me get through deciding which path to take next on this journey I started last year. I’m now more comfortable in making the decision thanks to your thorough input and encouragement.

I’ve decided to take the path-of-least-resistance and zero extra-tasks other than adding to what I already have on my website https://www.technologysalad.com . I’ll start it as a blog and allow for feedback from folks on how well it works for them. This will allow me the greatest freedom in how the information is presented and collected, negating any hurdles or roadblocks potentially consuming my precious time from canned/rigid formats. I will use other services if they compliment my efforts while also making the process more efficient for those seeking my works.

Cheers,
Brent

So, @superhans , because you have taken the time to help and encourage, and if you don’t mind :grinning:, I’d like to send you the entire mod-package…there are 10+ mods that’ll make your Cetus dance like no other. We can discuss the details via private message Andreas, I’ll contact you via pm when I’m ready to send, sound good?

There are other folks that have made an impact on my journey, I’ll contact you folks via pm, big thanks to you as well!

Cheers,
Brent

Wow, thanks Brent! I’m happy I was of help! And yes please, I would gladly receive the mod-package and apply it to my Cetus. I surely will provide feedback at least! Right and take your time, when you’re ready, feel free to contact me. I’m out of town the next days, but will have time for it the coming weeks/months.

Cheers,

Andreas

Alrighty then, travel safe and chat later.

Good journeys to you,
Brent

Thanks a bunch! Good and productive days to you!

I hate to be the bearer of bad news but think you’re investing your time and efforts into the wrong project! Based of the activity of this forum, this isnt the most popular of printers (even if it is good) and seeing as the main focus of this product range is price then i cant see you selling too many “mod packs”

you might be better off trying to cut a deal with Tiertime, if they like your mods and they get incorporated into the product then you maybe get a royalty from each sale?

Thanks for your thoughts @onis_uk …and the possibilities.

If you have followed my story from the beginning, you may have missed the driving force of this project. It’s not about the time invested or the efforts applied, and it is precisely the right project for me… from the beginning til whenever it stops providing me moments-of-freedom.

One calculated side-effect of those moments-of-freedom has proven to me that for many years and even nowadays, not-so-precise structural-components have been trusted as the backbone to which precision-components are attached.

A long time ago, I was lucky to work alongside a brilliant electrical and mechanical engineer. A humble elderly man he was that time, and I say “lucky” because he graciously shared some of his brilliant deviations. Many lessons subtlety evolved over many years of our workstations being within a pencils-drop. There was one lesson that has served-me-well across many differing careers since, most-certainly not easily mastered, but if honed over-time, one that is the backbone of analyzing “symptoms” and revealing the actual cause thereof with almost effortless pinpoint-accuracy. Causality buried within misleading symptoms, compounding and twisting-the-clues at every layer peeled…I simply love the chaos …happy to be in it …and suffering when it comes to an end.

Doesn’t matter if many folks make-the-leap and support my works, I could very easily walk-away from publishing…ever. But if I do publish, and when the project helps some attain better-quality results quicker and more reliably from an affordable machine… fantabulous!..mission accomplished! I already know one… and that’s all that really matters… it’s all about the journey :wink:

Cheers,
Brent

1 Like

Hello,

Cetus 3D printers are pretty nice from my point of view: I bought 3 of them: 2 extended and 1 Standard (all MK2).
For sure they can be improved.
I already solved the Z axis tremors with a tough solution : see attached photo.

To summarize:
1-Original “thin” aluminium plate : changed : new one is 11mm thick, surface 250 x 250 mm: heavy, robust.

2-Aluminium pillar: 40 x 40 , 310 mm height. Tightened to the aluminium plate, using a M8x60 screw. Contact surface end milled to guarantee a perfect right angle mount on the plate.

3-Then Z axis “locked in place” using 2 locking plates,5mm thickness, T-nuts and screw.

Believe me: Z axis mount is not shivering anymore…

Another pretty convenient upgrade: a simple switch on the buzzer line: no more “beep, beep,beep…” at 2 or 3 o’clock in the morning at finished print!..

Also, in progress: infra-red sensors end-stop positioning and TL smoothers on all axis. CPU replacement with a TinyFab one (and yep, you can drive a Cetus 3D with Simplify3D)…

I will post some other photos once the second printer will be fully upgraded (including, I hope, a plexyglass enclosure to allow ABS printings, as well as other “technical” materials…

Some clear visible steps forward, to better prints quality

Best regards from France , guys!:raising_hand_man:

1 Like

Nice robust upgrade you have there, great work! The use of stronger fasteners is for sure needed in many of the structural areas.

I’ve been using Simplify3D for awhile now, just love the print control at each layer level.

I’ll be posting my solution very soon!

cheers and keep-up the great work you are doing @tasson74 !
Brent

These mods we are creating make this Cetus printer a true workhorse for engineers, product developers and prototyping houses. Heck, you can fit 2 or 3 Cetus printers in the same space as more expensive printers, printing potentially 3 times faster and at the same or better quality!

1 Like

If all goes well, I’ll publish the z-axis mod this weekend, and hopefully a video to show the print accuracy at high-speed.

June16 edit: forgot about Father’s Day and a Birthday! Will try for Tuesday.

cheers,
Brent

1 Like

Totally missed this, very looking forward! Pushed my 3D printing hobby aside for a couple days to finish some wood work project, but now I’m laser focused again! :slight_smile:

I decided to visit a local machine shop to get advice on the most economical method to connect several mod-parts. Even though I have a precision cnc mill and lathe, a second opinion is always a good idea. I’m making a small change to lower the cost of machining the z-axis stiffener, so a few more days will pass before the reveal.

A few months ago I contacted a 3D filament distributor about extrusion tolerances and mentioned I was tentatively planning an “Internet Contest” around the first-look video for the z-axis stiffener, they expressed interest and offered prizes of 10 spools of filament and 3 filament-spool “smart” containers that dehumidify as needed. I’d love to follow through with the contest, would be a ton of fun for participants.

cheers!

Ah, I imagined that the mods are all 3D printed, but of course very precision and stiffness is key, plastic doesn’t cut it always I suppose :slight_smile:

Cool thing with the contest! Will have to think up a nice little demo project, sound like fun!

Thanks for the update and sorry for the slow answer rate here…

@superhans , there’s just no-way to properly stiffen the backbone without at least aluminum. Even the stainless-steel base everything attaches to is quite flexible, not so noticeable without appropriate measuring devices.

I have several mods that stiffen the extruder axis, but they are not the ultimate solution. The problem is the aluminum extrusion, while it does provide a convenient and inexpensive structure to attach things to, it’s not designed to provide a backbone for linear motion. It’s use keeps these printers affordable and within the reach of school budgets and those without deep-pockets…kudos to Tiertime!

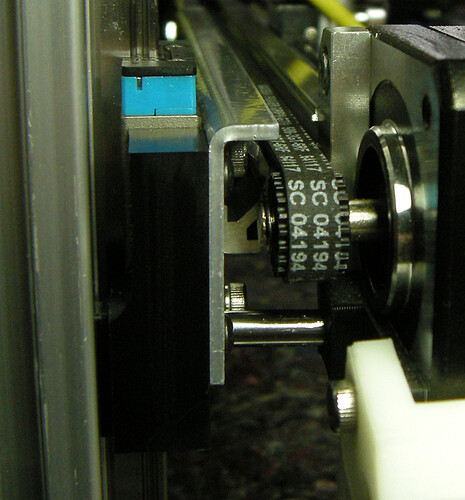
The z-axis 3D printed belt-connector finally gave-up on my printer. Was thinking of using aluminum and mill a new belt-connector but decided to use Delrin and fatten the connector to mate with the side of the linear-guide, thereby decreasing the stress on the connector. Feels like machining butter.

I kinda fell into another rabbit-hole, have a tougher extruder axis in-mind and will allow for a print-bed of around 220-230mm’s…tis tempting, …but…must…resist!

cheers!

Yeah, I guess those aluminum extrusion are merely the cheapest and lightest way to get something that is fairly stiff via their profile, but probably not the ultimate solution. You gotta post a photo of your new connector replacement. I googled Delrin (never heard of it before), but can’t yet imagine how you make use of it.

And yes please resist the next rabbit-hole at least for a bit :slight_smile: Thoroughly enjoying your posts though, always packed with things I have not much experience with yet.

Cheers!

1 Like

Delrin features…

  • Excellent dimensional stability -outstanding abrasion resistance among thermoplastics and metals, so when mated with the linear-guide, the mating surface dimensions will remain stable for longer periods. Very low moisture absorption -consistent properties means less fastener creep. Moisture, lubricants and solvents including gasoline and gasohol have little effect, which is important in parts incorporating self-threading screws or interference fits.

  • Continuous use temperature of 180°F -retains much of their toughness through a broad temperature range… so very little fastener creep allowing the screw to remain locked at the desired torque for longer periods.

  • Easy to machine to close tolerances, I strive for less than .0005" tolerance over 5 inches.

***high tensile strength, stiffness, resilience, fatigue endurance and a low coefficient of friction against metals

The next version I’ll wrap it around the corner of the z-axis in the photo. This will help reduce the vertical yaw movement of the linear-guide on the rail. You might be surprised how much the yaw movement has on the line-width tolerance.

The yaw tolerance of the linear-guide block is a huge variable when leveling the y-axis to the print bed. The question then becomes, when leveling… perform this procedure when the y-axis motor is energized(powered) or not-energized? The most accurate method is when the motor IS energized!

cheers!

I’m posting this pic hoping it will help others with their ongoing mysterious printing issues, specifically the problems @rogermc has been experiencing here

I was planning on providing sufficient documentation along with any reveal-pictures of my MKII printer setup, but time is passing too quickly these days and I’m experiencing very tough days with severe pain from a car-accident many moons ago…so this picture is posted without supporting documentation. Heck, I was even planning an Internet Contest with many cool prizes along with the introduction of my collection of mods for this printer.

Interestingly, in the last post above, the photo of the Delrin belt-connector also shows another simple mod that increases print-accuracy when combined with other mods I’ve designed for the extruder assembly. I purposely set the camera-focus on that part instead of the Delrin connector :wink: , you know…for the fun of it … and maybe even some aha moments for folks.

Improving/designing industrial and general consumer products has been an enjoyable focus for many decades, I’m not going to waste any of my time or yours discussing where I’ve been professionally to support my works. I’ll just say “I’ve kinda got-a-knack for a bunch-of-differing-stuff” :sunglasses:

Ok, enough rambling…

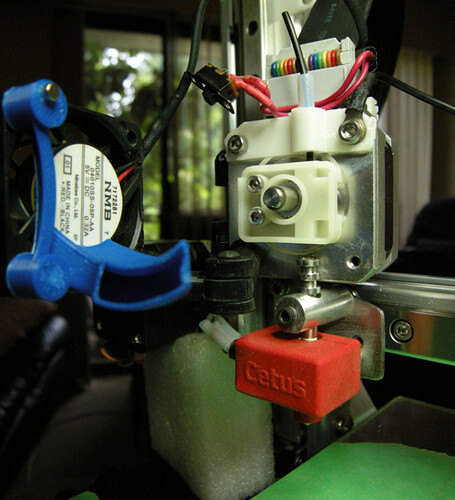
above: extruder motor adjustable in the vertical and horizontal, nozzle and heater-block adjustable in the vertical and horizontal, fan/duct assembly swings in all-directions. Rock-solid nozzle-mount provides for extremely accurate retractions, layer-height, layer-width and vertical alignment. The vertical position of the nozzle is one of the most important preventative maintenance tasks on-the-list of things-to-do for error-free and accurate printing. The round aluminum holding the nozzle also lowers the top-of-the-heat-zone in the nozzle. Securing, aligning and cleaning the nozzle is by-far the best things you can do to your printer in your quest for reliable/accurate prints from your Cetus. The filament you see loaded is Ninjatek Armadillow.
image

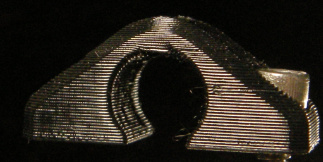
I just printed my first model with the Armadillow filament, the only problem I have is I’m experiencing too much temperature-swing …this filament has a very-tight temperature tolerance and is the reason why the photo above has surface artifacts and the bridging somewhat failed(among many other reasons)…while printing I had to turn the fan on-and-off repeatedly to keep the temp within the 4 degrees celsius tolerance needed for the quality I’m looking for.

The above photo is printed using 3 layer-heights, .30mm, .20mm and .10mm , 3 different layer-widths, .40mm, .50mm and .60mm respectively. There are also 2 different infill line-widths along with 2 different infill patterns. Using these settings has allowed for rigidity where needed, and extra vibration/frequency -dampening where needed on these extruder motor-mounts.

July5 add : Oh…the chamfer you see in the photo above only exists on this side, the other side is a 90degree edge… the chamfer works with some of the interior structures.

July6 add: you may notice the head of the socket-head screw, just to the right, in the rail, is closer to the surface of the rail compared to other rail fastener heads. This screw is 6/32" x 20mm long, the screws main function is to lessen the horizontal axial-torque in the extrusion. When you provide ultimate-strength stabilization to the nozzle assembly, z-axis tower and x-axis, you are now left with the lesser noticeable structural forces/variables governing print-quality…axial-torque and linear guide-block tolerances. The 6/32" x 20mm fastens the guide-rail to the other side of the y-axis extrusion arm…there are 3 locations I’ve employed y-axis axial-torque limiters.

These lesser forces are difficult to measure, they happen quickly and are not noticeable when they happen unless you use lasers to measure the movements. I have also found the effects of these forces on print-quality are less noticeable on thicker layer-heights of .30mm and above. I’ll try and prepare some visuals.

update: heating issue, solved …it’s been awhile since checking the heat-block thermal paste, re-applied a nice blob in each hole and re-inserted the heating components…back in business!

cheers and good journeys folks!