"Speed for the Need" - a mod-package increasing print-accuracy on the Cetus

Ha, I suspected you angled the stepper and mounted it on top of the y-axis! No force twisting that axis anymore :wink: The extruder and fan setup is unexpected! Very cool, especially how much visibility you gain to observe the print run. Nice! Still many things to discover, how you mounted the motor for example and how many parts it requires, separate mounting brackets for the motor and extruder plus the holder rod.

Regarding the 6/32" x 20mm screws, did you drill extra holes in the extrusion profile? I mean that is the easy part, good thing there are spare holes in the guide rail :slight_smile:

Looks very promising, thanks for the updates!

PS: And Delrin has a really strong feature set! Good to know!

A quick pic from another post I made recently…

Yes I drilled holes through the extrusion and tapped threads into the extrusion nut used by the y-axis steel bracket.

This method dampens the axial torque a fair amount, but is not the ultimate solution. The ultimate solution would be to get rid of the extrusion and use an aluminum profile with much higher strength in all planes where unwanted torque exists. Once I have the z-axis mod published I will be prototyping a design I have in-mind for a y-axis better suited for cantilever style printers and solves the extruder-weight and inertia problem that twists the currently-used extrusion material/profile … possibly allowing for a larger print-bed.

Last week I designed a mod that further stiffens and limits the twist effect this type of aluminum extrusion and y-axis design allows …

This one is not a simple bolt-on mod! Requires the faces of the extrusion to be milled absolutely flat and square along with the steel bracket. Because the top bend of the steel bracket is not at 90degrees to the z-axis like the bottom bend, I had to remove more material to get the flat to be square with the z-axis. The underside I filed because milling was not possible, I didn’t get far with filing so I simply steel shimmed so it mates with the extrusion. The extrusion is now fully sandwiched in the u-shape of the steel bracket, no movement possible. FYI, Misumi among other suppliers offers this type of extrusion with two-sides milled flat.

Wow that looks solid!

Curious about your ideas regarding a more suitable y-axis for cantilever style printers. Would it rather be balanced like tower cranes?

Thanks for mentioning the Misumi extrusions as I don’t have a mill at my disposal :slight_smile:

It’s solid for sure. I had considered a more balanced setup like a tower crane, but not using extrusion. I guess extrusion could be used, a longer length on the motor side, long enough so the y-axis motor could be mounted on the opposite side… thereby balancing the weight for the length of the y-axis and also transferring the weight of the motor from the extruder side where the axial torque of the extrusion needs to be reduced. If you’ve ever stopped a print job just after a z-axis lift and inspected the print at that point you’ll notice a blob of filament. Under magnification, you’ll see an impression of the tip of the nozzle in the center of the blob…this is an effect of the axial torque from the extrusion twisting when the z-axis lifts. The z-axis lift using stepper-motors is a violent action, it’s for this reason many 3D printers use ball-screws for driving the z-axis. My mini-mill uses 1/2"dia - 20TPI to drive each axis … so 40,000 stepper-motor pulses to move 25.4mm… the steppers have 294oz in of torque and I use Gecko 512 micro-stepping…extremely smooth axis-movements comparatively.

edit: I should also note…about the excessive axial torque of the y-axis extrusion producing blobs as a result of the z-axis lift… there is another contributing factor producing the same symptoms. It’s where the heat-block mounts to the sheet-metal bracket. The two stainless steel tubes coming off the hidden side of the heat-block are used keep the heat-block aligned to the sheet-metal bracket and also insulate so the screws don’t draw too much heat from the heat-block. There are two stainless steel screws inside those two tubes. They will loosen over time, as they don’t have lockwashers installed. When the extruder motor struggles to push filament into the nozzle for various reasons like improper temperature at faster speeds, too much moisture in the filament, foreign debris in the nozzle requiring a cleaning and many other factors that produce the clogged nozzle “clunking and thumping”, those two screws will creep loose, and even worse they will start breaking the fragile threads in the aluminum heat-block. The threads fracturing will take a long time, but the screws coming loose can happen quickly depending on the severity of the clunking. It would be a good practice to check those screws every now-and-then and tighten as needed. I actually re-tapped to a larger screw size and added lockwashers to ensure they don’t loosen and degrade the print-quality.

Here’s a quick pic of my z-axis and x-axis backbone. This is an MKII, the extended version has another section that bolts onto the top. This mod is completely bolt-on/add-on, no drilling required. The x-axis is robustly connected to the z-axis. In the pic you can see an additional footing effectively stabilizing tall print-jobs.

cheers!

Nice! Ha and the z-axis stabilizer looks like a Z backing the z-axis! Lots of meta-levels included :slight_smile: 
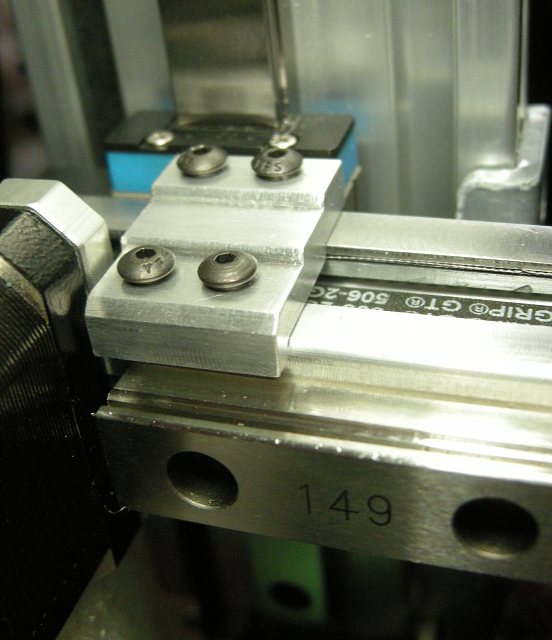
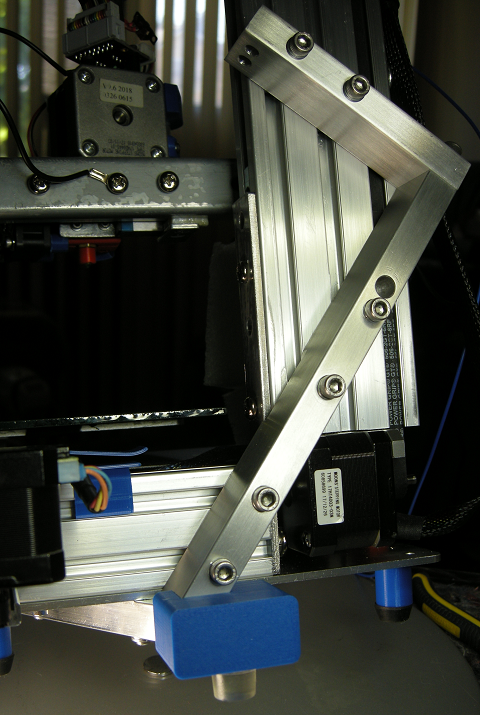
It for sure looks a LOT more stable as a plus! I totally dig that you constructed it as a bolt-on mod!

Ha…you noticed the letter z reference, not intended, but happy coincedence. The surfaces against the extrusions are milled flat and square to within .0006" over roughly 5" of length. The x-axis stiffener underneath was difficult to fabricate, there are 3 bolt-on locations that tie into the x-axis, the base plate and the extrusion connector between the x-axis and the z-axis. It was very important to have the bolt holes in the stiffener be the same diameter as the bolts so there is little chance of misalgnment.

The modded printer is so stable you can attach other mods like a filament reel, wiring harness and other peripherals without effecting print quality. I’m printing at very fast speeds, on larger models even up to 170mm/second…but to print at those speeds a more advanced slicer is needed to optimize filament flowrate, acceleration etc etc. Lol, I printed a 2020 extrusion profile at 130mm/second…each layer is a blip in time…it’s almost unbelievable it’s printing the full outline in about 1 second. I haven’t printed the 2020 profile since I added the last y-axis mod, think I’ll give-it-a-go… maybe 150mm/second…lol

There doesn’t look like there’s much interest from other Cetus users, so I’m happy I did not go ahead with a website and other administration tasks. I guess other Cetus owners don’t realize how much print-quality and speedy printing is available with this mod and the others for the y-axis, I’ve compared my prints to other more expensive printers and this modded printer easily out-performs in quality and speed.

I’m going to move on to other projects I have been eager to fall-into. I’ve been designing a universal equipment-mounting system for my electronics lab and prototyping workstation so I’m able to work for longer periods without the dreaded pain disrupting my focus. The new y-axis design is also a contender for a new focus…we’ll see which one grabs me :wink:

We can chat later via pm about getting a mod-pack to you.

Cheers and good journeys!

1 Like

Jebus, those print speeds are amazing! Do you know the default of the Cetus? 30-40 mm/s?

I can totally get when you shift your focus off the Cetus onto other projects for a while, but kudos to what you achieved!

Indeed, for proof-of-concept prototyping the print-speeds attainable are crazy fast for a cantilever style printer. Slowing to 80mm/sec for good quality, and 50mm/sec for high quality are still quick prints.

When you open the UPStudio Material Editor you will be able to view and change the default speeds for layer-heights, line-thicknesses and many other settings for a given material. Creating specific profiles is an easy process.

@techsalad I am very interested in you stability mod pack. Please do let me know when its available.

@skezo , sorry for the late reply …I was on vacation for a week.

There are many parts to the full mod-package, the z-axis stabilizer mod will be ready next week. The y-axis mods will be ready towards the end of September.

Do you have the standard or extended printer?

I’ll send you a private message when I have the pricing available in a few days.

Best regards,
Brent

No worries and thanks for the reply.

I have a standard MKII.

@skezo , I had made some changes to the z-axis stabilizer mod and required re-quoting from the machine-shop. Just checked with the machine-shop, they’ve been very busy catching-up from summer vacations. They will have the quote ready by Tuesday Sept.17 at the latest. So sorry for the delay.

Best regards,
Brent

@techsalad Awesome thanks for the update.

@skezo Finally received a call from the machine-shop this morning. They’ll be working overtime on the weekend and are promising my price quote by Sunday Sept. 22.

With any product in it’s early stages, the question arises, how many to produce? To-date, there has been little indication of demand for this mod-package. To be honest, until you @skezo expressed interest, I had moved-on to other projects…there has been only one other Cetus owner having expressed interest.

I’m extremely happy with my Cetus printer with the modifications I’ve made to enhance the print-quality and enjoying the insane speeds I’m able to achieve when printing prototypes and proof-of-concept with very little loss-of-quality. Basically, it boils done to … I have a small-footprint(truly desktop) 3D printer that prints like a champ. Every print is just like the last one, no blobs, no surface artifacts, no strings, no nozzle clogs, every layer is right where it should be… and I’m still using stock electronics and stock nozzles…lol. Even though I have an extra Azteeg X5, better steppers, a beta first generation Bondtech extruder assembly, what’s the point of installing those goodies??. Ok, there are reasons why I will eventually upgrade the electronics and extruder assembly… but those reasons aren’t based on print-quality! If I was still running a 3D Hubs print-service(in 2013 there were only 8 hubs in Western Canada), I’d purchase 50 of these printers, install my mods and run-circles around the competition… I’d provide a better quality 3D-print quicker than those with $2500+ 3D FDM printers. Meanwhile, I have a $3500 SLA printer sitting-idle collecting dust…why? …post-processing…it really sux… heck, I can run a print on the Cetus, twist the print off the bed with my fingers and use the printed model. Well, not every print is ready to use, I sometimes have to snip off the tiny string of filament from where the print finished… and infrequently the print is welded to the green painters tape on the glass print-bed.

Ok, enough rambling, @skezo , the original point I was trying to make is …if there are only two Cetus owners interested, and I order two sets of mods to be machined, the cost from the machine shop will be too expensive. We’ll see what the machine-shop quote is this weekend. I may have to machine the parts myself, not something I’m looking forward to, it’s incredibly repetitious and it’s boring work. It’s the “boring work” part that gets in my way… as I suffer extreme pain daily and “boring work” is too little to distract from the pain and mistakes are easily introduced.

So there you have it…full transparency… that is where these mods currently exist.

Cheers,
Brent

The weekend came and went, no quotes arrived. It seems the normal these days is cherry-picking potential orders for the greatest revenue, and those that don’t hit the top 10 stay at the bottom of the list until there’s a lull in the incoming projects, not to be confused with… a temporary lack of manpower to meet the demand. The other thing I see happening is long-time customers automatically slotted into the top-ten projects to concentrate on, this is one of those areas where capitalism kinda fails, especially when attempting to support local business. Well, this is strike three, and that’s one too many for me… so it’s time to cut the tether-of- forgiveness and move on. Sorry for the delay @skezo , let me know if this is strike three for me and you have lost interest.

Best regards,
Brent

@techsalad no worries, thanks for looking into it. Would you be open to open sourcing your work on something like github? This way people can use their local machine-shop to get the mods created.

@skezo , I have considered the many ways of making the mods available to folks. Even though the machining processes required to make these mods might look inexpensive to produce, there are a couple of features requiring less than .001" (.03mm) tolerance. When a tolerance dips below .001" the machining cost increases. The angle of the longer bar must have a very low tolerance otherwise it will not comfortably fit in the very-narrow safe-zone where it is close to the print-bed and the z-axis stepper motor. And then there is also the face of the aluminum bars that meet the extrusions, they are milled flat, also requiring a low tolerance over the lengths. The other thing going on is… these extrusions, by design from all the manufacturers, are not flat over the widths of the extrusions. When I hold a Certified-Flat Laboratory-Grade bar across the widths of the extrusions, they are not flat-and-square, some areas might be but not all areas. I was as surprised as you might be. This is no fault of Tiertime, the extrusion quality used by all the printer manufacturers are low to keep the costs lower. So I will likely have to include brass shims.

The short answer is, from your local machine-shop, the cost of making one set will easily be $100+. If you don’t care about dimensionally accurate prints, and only want to get rid of the z-axis wobble on tall prints, then I guess you could relax the tolerances and get the cost below $100, but it won’t be by much. Their setup fee will be $40+ …probably closer to the standard $65.

I’m looking to get the selling price of the three aluminum stabilizer bars well below $100, closer to the $50 mark if possible. If we get 50 Cetus owners committed then we are probably around the $70 mark, 100 sets will be closer to the $50-60 mark.

If I can be so bold to say…ok I will …
These stabilizer mods are awesome, not because I’m biased, they really do the job… all the way…very little room for improvement if at all. There is no other way to effectively apply a completely bolt-on(exoskeleton type) solution that ties into the print-bed axis with the minimum amount of materials and zero interference as inexpensively as this mod-package provides. I know, that’s a tall order for sure.

I have installed 11 mods on my Cetus printer, they all work together. Whenever I print something, I have to say I’m just amazed at the quality… from a sub-$1000 printer! …and a cantilever style!, not the most popular of 3D printers for sure.

If folks do just one thing… just one mod…stabilize the nozzle…your print accuracy will increase by a very large amount… guaranteed. That mod combined with stabilizing the z-axis will make you smile.

Cheers,
Brent

Just finished building a storage/dispensing box for 6 reels of filament. To reduce the friction of the filament delivery I designed a ball-swivel that attaches to the box minimizing the friction as the filament moves from the moisture controlled environment through to the extruder. As the amount of filament on a reel declines, the friction through whatever you use to deliver the filament to the extruder increases…and by a fair amount I might add. When the amount of filament on the reel gets to less than 50%, the amount of friction within a moisture proof delivery system triples… more depending on the type of filament.

I found a manufacturer of PTFE tubing that reduces those amounts of friction. It’s the Capricorn XS brand. They have a 4mmOD x 1.90mmID PTFE tubing… I highly recommend the Capricorn XS tubing, it’s pure PTFE and is very slippery. The 1.90mmID versus 2.00mmID also reduces friction by some amount, especially flexible filament. The XS type is rated at 340deg Celsius. They also have the XS type in 3.00mmOD x 2.00mmID, this is the size in the upper neck of your nozzle. I believe the tubing that comes with a standard nozzle is only rated to 200deg Celsius, so if you are printing at above 200deg Celsius, then the tubing is degrading at an advanced rate and over-time will contaminate the filament as the tubing burns, so frequent cleaning is required, by removing the tubing and wiping clean the black grunge of burnt filament and burnt tubing. The other thing happening before the burning is deformation, so it will no longer line-up with the surface of the lower brass part of the nozzle as engineered by Tiertime. There is very little room for error here, if the nozzle ptfe tubing is not perfectly square at the bottom end, there will be filament delivery issues. If the nozzle tubing is too long it will flare and choke the filament creating filament delivery issues. The problems created when using a standard PTFE tubing above the rated 200deg Celsius are numerous…basically most of the problems reported by Cetus owners when filament is not delivered to the print-bed as expected.

OK, done with today’s ramblings…as usual…assume the position…happy printing that is!
Cheers,
Brent