No worries.
Unfortunately I tossed them out so I can go back and inspect them again but I believe they are slicer artifacts of the print extrusion direction, clockwise and counter clockwise, the wiggle, and a thin print wall which is mostly hollow.
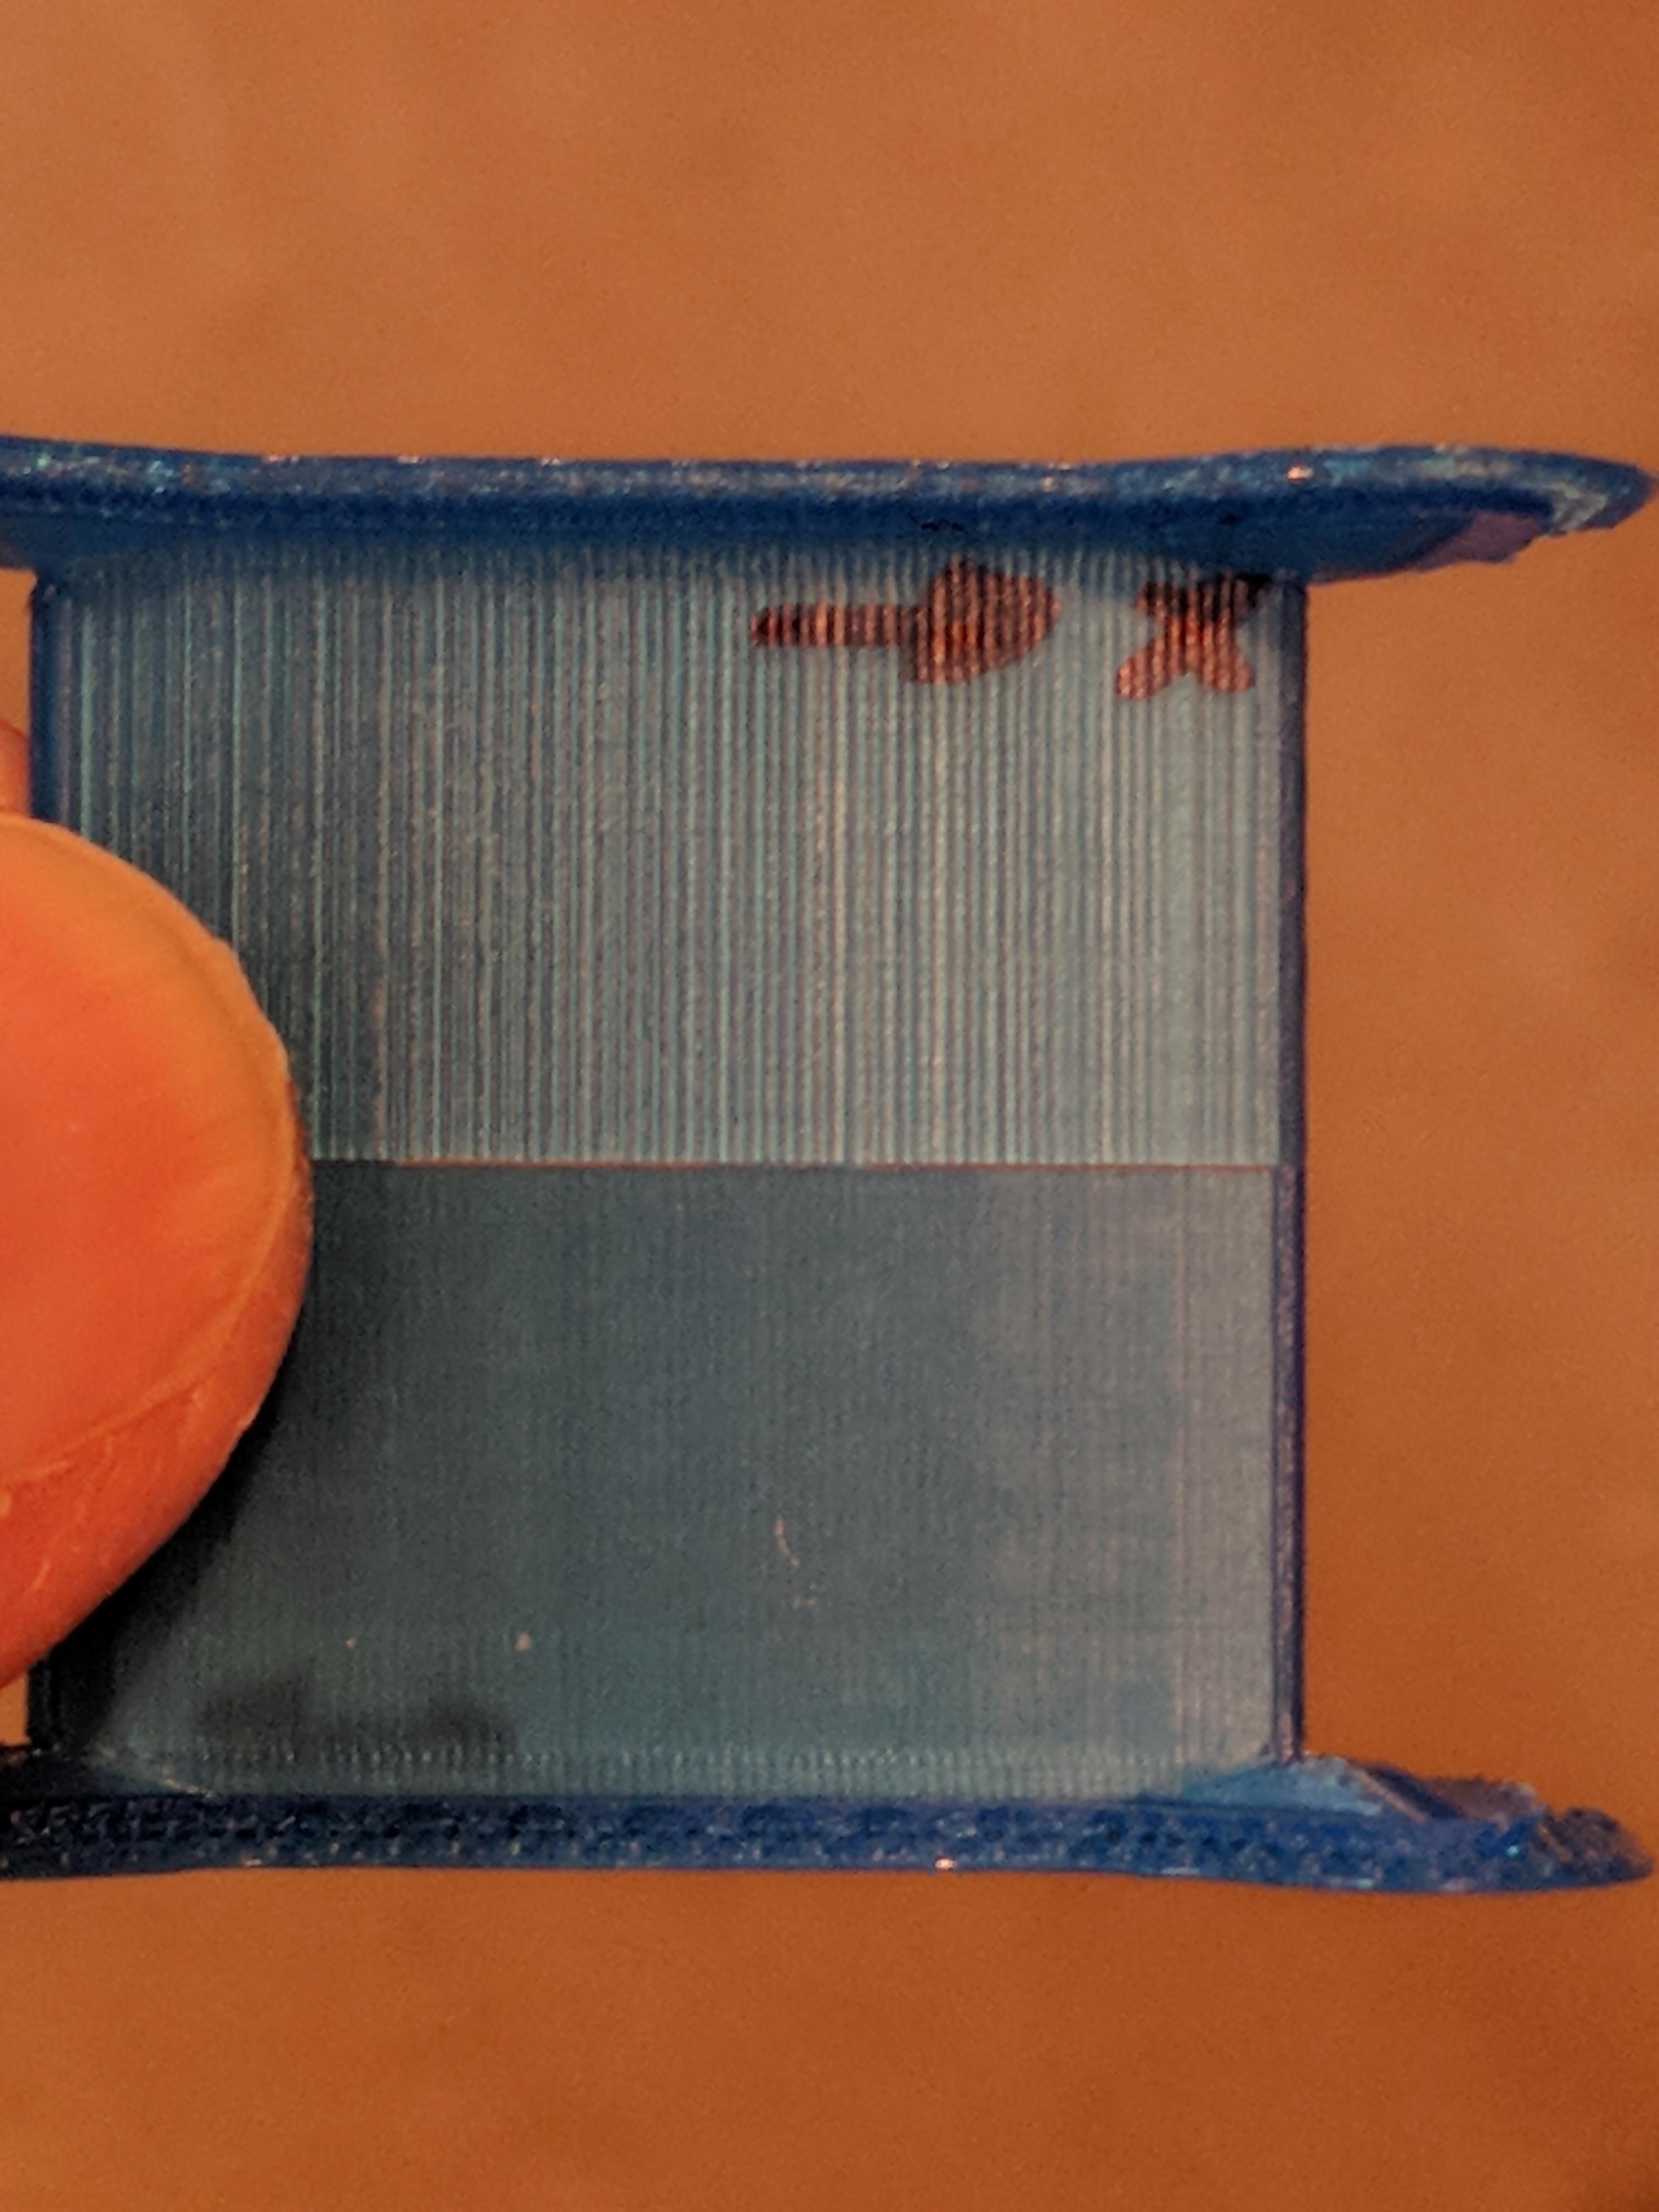
I have an interference fringe printer test on thingiverse and it’s a harsh revealing test. You need good dry transparent filament for the test because the layer lines form a lens and the visual measurement exploits defects in the cylindrical surface of the layer lines. I re-tested my Cetus with the new nozzle support bracket installed. Good and bad news, it prints better but I can now see the next layer of the onion. Previously I had thought that a print artifact was caused by the extruder motor coupled with some nozzle extrusion flow dynamics. Today I am almost certain it is an oscillation between the belt, the axis stepper motor rotation direction (belt length-stiffness and/or micro stepping), and the mass being moved. My full fringe test is two hollow walls printed parallel to the two horizontal axes. I don’t even need optics I can FEEL a subtle continuous short period oscillation on three wall faces with my finger nail, and one face is perfect but in truth I think the oscillation period is just much shorter and the amplitude is just much smaller. I guess I should have started this last part with a spoiler alert, ignorance is bliss.
-Peter
Once I installed the nozzle-post stabilizer and enjoying an increase in print quality, I also noticed the same artifacts you are now experiencing. It’s a difficult one to troubleshoot for sure. I reduced the radial-torque of the y-axis extrusion which effectively minimized the effect. I have yet to install another bracer on the end of the y-axis to improve further. I’m thinking the effect is a combination of the extrusion axial-torque and the stepping of the extruder motor, a four-phase motor for extruding the filament would be a huge upgrade to quality as it would not have to turn as far as a two-phase.
Better yet…a servo-motor for extruding, but another peel of the onion would soon follow.
For sometime now I’ve been entertaining the thought of designing motor mounts with a feedback system to drown the oscillation.
The attached pic is the best wall face and the typical wall face printed fine 0.1mm layer. Just not certain. It seems to vary with the filament which implies its the extruder, however one wall face is very good which implies its not the extruder.
Hi Peter,
OK, those wall faces are not what I expected from your first description.
I’ve downloaded your interference fringe printer test from Thingiverse, and will print the test model on my Cetus. I don’t have transparent filament, but I’ll print the wall-thickness as thin as possible…I hope I kept that Simplify3D profile… it was ridiculously thin walled at something like .15mm line thickness, no raft, no supports.
Stayed tuned, I’ll report back here with the results.
Brent
Hi Peter,
Regarding your pic of the interference test model…
I printed your interference test model, but found I have a breach in my moisture-proof filament storage and have a moisture problem to correct… so I’ll post a pic once I have the filament dried.
While the filament is drying…
At first glance I was surprised to see the vertical artifacts with such intensity, but not surprised they exist.
There’s a long list of why those vertical lines exist… the combination and compounding effects of those events are contributing to the intensity you have experienced as displayed in your photo.
Traditionally, software/firmware has been used to smooth-out the undesired effects from the use of inexpensive hardware and hardware-components that get the job done because of software/firmware but are not being used for the primary reason/s they were originally designed for in the marketplace.
I’m not going to further discuss those vertical artifacts here in a chat forum, too much can be lost and misinterpreted when using a textual medium for the exchange of ideas and solutions. But I will say the major solution lies within the extruder delivery system.
Cheers,
Brent
Brent
I put two shim washers between the top of the cold end and the black ABS extruder part around the feed gear. The bracket now constrains the cold end with a much higher clamping force mainly because I don’t have to worry about bending/breaking the two horizontal heater mounting bolts. The 4 wall faces look good when printed with a 0.15 layer on fine. Printing with a 0.1 layer the wall surface is improved but the issue persists. Comparing walls printed on fast and fine settings, fine is smoother and the period is shorter.
My bet is on a micro step induced, mechanical vertical resonance that is dampened by the extruding filament. It could be that a stiffer vertical axis helps or it could be the linear guide rail mechanical tolerances are just not good enough.
Best wishes
Peter
Peter,
Nice work on increasing the stability of your cold-end nozzle mod.
I have found through rigorous testing, any stabilization of the nozzle will produce a better quality print…but doing so will peel-the-onion further if the z-axis is not sufficiently stabilized. I have fixed the moisture problem in my filament storage system, a cap had popped-off one of the filament exit mounts, and with the extra rain of late there was excessive moisture saturation in the silica-gel. I have printed your interference test model and have ultra smooth walls at .40mm wall-thickness, I’m not experiencing the same artifacts because my z-axis is rock solid. I’m having a rough time due to a pain flare-up but will post some pics hopefully within the next few hours.
In addition to stabilizing the x and z, I have isolated the extruder-motor from the heat-block and nozzle assembly. Using a nozzle stabilizer post as I have, those two fasteners off the heater block are no longer required so I removed them…a side benefit is they are no longer sucking heat from the heat-block and the heat-block temperature doesn’t fluctuate as much.
Regarding the y-axis linear guide rail… well…what can I say here…a precision guide-rail fastened to a not-so-precise aluminum extrusion…there’s a ton to discuss here Peter. The tolerances are good enough when considering what the rail is attached to and especially how it’s attached. I have yet to document my findings and there are many!
OK, enough for now, I have a window of opportunity and need to get back to work in the shop.
Cheers,
Brent
Hi Folks,
A quick update…
I’ve experienced a few setbacks… I’m back in the shop now and working as much as my body will allow.
One of the setbacks has been due to Covid-19 restrictions, neighbors have been asking for help with all-things-broken. One elderly woman needed her eyeglasses repaired, another her food processor…there’s been many more… a latch for a bird cage, tv remote control, lighting lamps, vacuum cleaner, laptop computer, a grocery cart, beard shaver, coffee grinder… oh geez…the list is actually longer!
Hopefully not much longer folks, thanks for your patience and please be safe out there!
Cheers,
Brent
Hi Folks,
I’m thinking that instead of printer owners installing my z-axis stabilizer mod as their first mod solution, there is another mod…the nozzle stabilizer mod I designed that provides a huge boost to print accuracy and a slight increase to available printing speed.
The reason I’m advising the use of the nozzle mod before the z-axis stabilizer mod is two-fold…
-
Most owners probably print models that are less than 70mm tall, in this scenario I will design a much cheaper z-axis stabilizer that users could print themselves and simply insert a locally available stiffener. This solution would be affordable to most users and be far quicker than waiting for me to fabricate my ultimate z-axis stabilizer mod.
-
The nozzle stabilizer mod solves soooo many printing issues. Seriously folks, this mod alone will have the greatest impact on the quality and the accuracy of your prints.
I could make videos, provide pictures of before mod installed and after mod installed, compile lists of benefits, create pretty graphs and provide all kinds of numbers and measurements using laboratory grade equipment to prove my claims…that is not going to happen, and not because I don’t have the lab grade equipment. The proof will be in the pudding…
I’m willing to prove the nozzle stabilizer’s potential by starting a beta-test program. But I’m not in a position to bear the cost, there’s just no way I could do that. If you desire to improve the quality of prints and the reliability of your Cetus then you should start with the nozzle stabilizer and then formulate an upgrade/mod path that fits your usage of the Cetus printer. You may find the ultimate z-axis mod is too aggressive for what you print with the Cetus, and a less robust z-axis stabilizer will be sufficient in combination with the nozzle stabilizer mod…who knows!?
The two metal brackets, the fan and motor attaches to and then attaches to the linear guide block are …well… I destroyed them in the various prototyping stages. Yeah…they be gone RIP. I have a few dimensions recorded, but not enough to make a precision nozzle stabilizer that adjusts for all versions of the extruder assembly. If someone would be so kind to provide me with dimensions…enough that I could make the two brackets…I would be a happy camper!
Cheers…be safe and stay strong folks!
Brent
Hi Brent,
Apologies, i’ve come into this late. Is your nozzle stabilizer to stop all that flexing that happens when it feeds and retracts?
I’ve been thinking of a solution to that myself.
I have 3D models of the metal brackets you mentsioned. Would a step file help?
Gary
Hi @progresstech , never too late Gary, thank-you for chiming-in! Yes it completely stabilizes the nozzle. Retractions work as intended, especially when using advanced spicing software and the combinations of advanced filament-stream control. It also provides greater control of the filament-entry position in relation to the fixed extruder drive assembly above, however insignificant a precise filament position might seem to some, filament shavings can contribute or even introduce problems within the upper nozzle.
As with most of the mods I’ve developed for the Cetus, the nozzle stabilizer has additional value added. I also wanted to lower the heat-zone in the nozzle for those not employing a higher heat-rated ptfe tube in the throat of the upper nozzle. I believe the stock ptfe tube is only rated for temps of around 200deg celsius, higher temps are rapidly degrading the ptfe tube. The ptfe tube in the upper nozzle is a critical component and must have a precise fit for reliable performance. When assembling the nozzle with a ptfe tube too-long for a precise fit, the lower edge of the tube will flare and start choking the filament passing through. This may not seem to be problematic, but if the heat zone is melting the filament enough on the other-side of the lower-end of the flared ptfe tube…unreliable extrusion performance is soon to follow. Molten filament will make it’s way in-between the tubing and the inner-wall of the upper nozzle, burn and liquefy and then flow back into the normal filament stream and into the model being printed. Another reason for lowering the nozzle heat-zone was to somehow effect the firmware interrupt in the hopes to shorten the heat-block temp monitoring/heating cycle, but I suspect the stock 8bit controller is already maxed-out. But, it did tighten the temperature tolerance providing a more reliable delivery of NinjaTek Armadillow filament.
Stabilizing the nozzle has completely negated layer-shifts, models knocked from their position on the print-bed, unwanted surface artifacts etc etc due to that flexing,the nozzle-height should only change by way of z-axis adjustments.
Another feature of the nozzle stabilizer…I’m designing a nozzle quick-change system, the current stabilizer mod is providing the base to future nozzle quick-change development. A nozzle quick-change system will help reduce potential pain flare-ups for me, and definitely reduce time-lost for folks frequently changing filament types.
The step file/s will help Gary, thank-you big-time!
Cheers,
Brent
I’m glad to hear that fixing the nozzle flex can have such a good effect. With limited time, it’s nice to know the effort will be worth it.
It’s interesting to hear your thoughts on the stock nozzle too. I ran some high temperatures, experimenting with carbon filled PETG, and suspect it might have caused some damage.
When I get a bit further, i’ll post some pics of my method.
How should I get the step files to you?
Gary
I’d happily test this mod out for you, we should all print the same file too to make sure we all get similar results…
I’m very happy with how my Cetus prints now so any upgrade would be awesome!
I don’t use my Cetus as much as I’d like, but when I do the print quality still surprises me!
@onis_uk , My extruder/nozzle assembly is heavily modified, I’m currently waiting for a few CAD files graciously offered from another Cetus owner before I design the mounting system to fit stock printers. I’ve added you to the beta-tester list!
I’m having a tough-time with pain flare-ups lately, I just can’t catch a break from them…one ends and another hits me with only a day or so of relief in-between…this current flare-up is relentless and I’ve been knackered for almost 10 days now.
Wish I could get these mods in the hands of those interested, it’s got to be frustrating for folks waiting patiently…it’s intensely frustrating for me having solutions but no windows-of-opportunity in my shop.
Hopefully not much longer!
No rush TS your health is more important than a 3d printer!
Hi Folks, it’s been a long frustrating journey getting the z-axis stabilizer mod to those interested in gleaning every-last-drop of potential for greater accuracy and speedier prints on the Cetus. I’m happy to report a solution to my dilemma…
Recently, a like-minded fellow I had done work for in the past contacted me about converting some 2D CAD objects normally produced using subtractive manufacturing into 3D CAD objects destined to be produced using additive manufacturing. The magic happened when he mentioned trading labor… within a few moments I began to notice a huge weight lifting from my shoulders…omg is this really happening…indeed it was!
So the deal was struck and will begin this weekend…sounds like some z-axis stabilizers will be … POOF …magically appearing in my tiny shop area soon!
I’m going to reduce the price from $65USD to $50USD for the duration of this unique deal I have entered into!
To save time, for those still interested, please send me a quick yes or no using whichever method you are comfortable with or used when first contacting me… post a reply to this thread, pm via this forum, email.
Thank-you all and good journeys to you…and of course… happy printing!
Brent
Technology Salad
hey whats up techsalad?
any news about modkit ?
look super cool and usefull
@fuckFace Hey there, the z-axis modkit is available…sold the first batch and waiting for more interest before creating a second batch. If you’re interested send an email to admin
at technologysalad com
cheers,
Brent
@techsalad, a bit late to the party but what is the current status on the modkit? I’m very interested myself.