"Speed for the Need" - a mod-package increasing print-accuracy on the Cetus

Greetings @runruns

Never too late! A new batch is being machined and will be ready to ship in 7 -10 days, possibly sooner.

I’m still offering the reduced price of $50.00USD, when this next batch is sold the price will probably increase to $65 - $85USD.

Could you send an email to “admin@technologysalad.com” to confirm your order and get you on the list for this next batch. I’ll put you on the list right now, but need the email to keep everything organized until the online store is up and running.

Best regards,
Brent

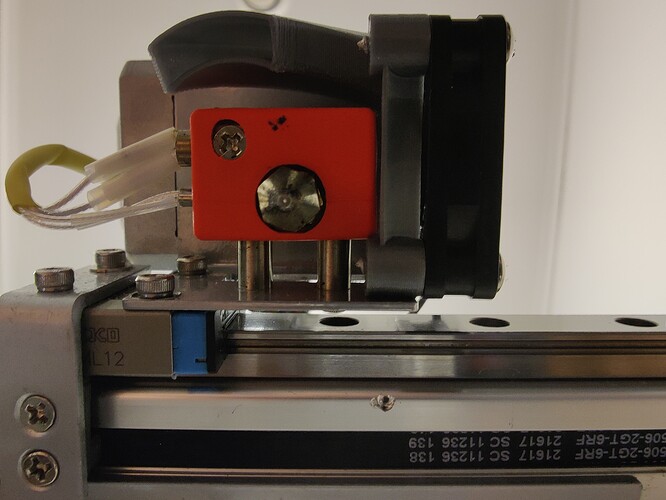
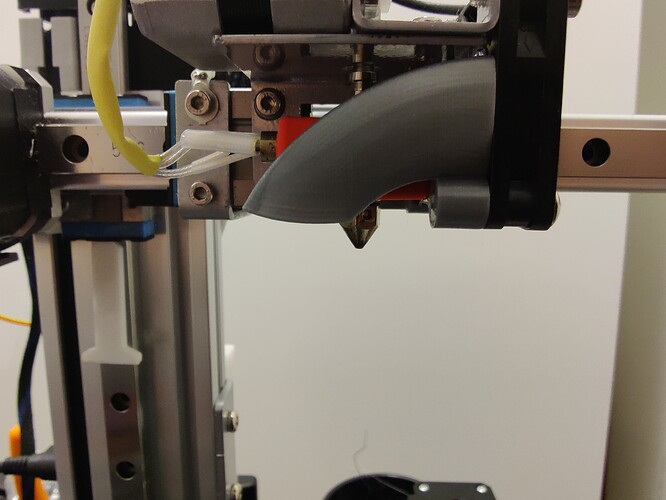
@techsalad G’day mate, how are things with you? Hope your pain isn’t too severe nowadays… I was wondering if you have an option for better cooling with a stock extruder? I have printed your fan shroud but it seems a bit misaligned for my printer. And works kind of good I guess, but it feels like I can do better?
I’m looking for a way to print a little bit faster until you are well enough to produce and ship the mods.
Providing pictures for reference on the alignment of the shroud and extruder.

Best regards
Tobias

@tibberz , Hi Tobias! Getting ready to start shipping this batch of z-stabilizer and nozzle stabilizer mods to you guys! It’s been a struggle to do anything in the shop of late due to the cold weather, soon I hope to be able to endure for longer periods when warmer temps arrive.

I would suggest a couple of spacers to the fan mounting but that would reduce the upper nozzle cooling. The upper nozzle cooling is extremely important to reduce nozzle clogs for this style of heatblock/nozzle assembly. The nozzle stabilizer mod you will be receiving moves the heat zone closer to the heatblock thereby reducing the need for cooling of the filament-entry-point of the nozzle, so you could then mount the fan with spacers to align the cooling duct.

I prefer to see the nozzle tip while printing because I use a high-speed nozzle-cam to analyze and fine-tune the filament flow, especially when using exotic filaments. Until you receive your mod package you might try using the stock style of ducting.

When you install the nozzle mod you are going to be amazed with the boost in print quality… I was! That stupid-simple little mod completely changed my 3D printing experience. Waaay better-quality prints and combined with the z-stab mod… much faster printing! I just can’t wait to get the mods to you… I wanna see your jaw-drop and the perma-grin that follows.

I recently installed Slice Engineering’s Copperhead assembly and damn it’s awesome. I’m using their Vanadium nozzles… another game changer! I’m also using V6 E3D brass nozzles allowing for temperature-stable high-speed printing… how fast? …models without sharp direction changes… 110+ mms/sec …on proof-of-concept models when I don’t care about perfect-quality … 130-150 mms/sec…even at 130+ speeds the prints are a decent quality.

With the Copperhead upgrade I’m printing eSun PLA+ with a 0.15mm brass nozzle, the level of detail achievable is amazing. I ordered a few E3D V6 brass nozzles “undrilled” …yup…I’m goin’ sub 0.10mm nozzles for super detailed models. I’ll probably drill a 0.10mm nozzle first and then drill a 0.08mm nozzle. I’m trying to convince Slice Eng to provide me with a 0.10mm Vanadium nozzle, I don’t have the tooling to drill Vanadium.

Oh, I’m using a Boron Nitride paste for the heatblock components…important that it’s “Boron”… huge difference in heat-transfer compared to regular pastes, I’ve done the research and testing for you. Aaaand “Plastic Repellent Paint”… huge reduction of blobs deposited on your prints!

The other news is I’ve designed a new cantilever style 3D printer(same style as Cetus). It will integrate all the mods I’ve designed, the physics I’ve learned about the cantilever-style and more. The print-platform size will be around 200x 200mm, maybe a touch bigger. A completely new y-axis assembly that does not use aluminum extrusion and only the heatblock/nozzle assembly will ride on the linear rail… I know… you’re likely thinking Bowden …and you’d be partly correct… I’m calling it a “Bowden Hybrid”. The benefits of a Bowden system without the drawbacks/cons. I’m thinking open-source and completely modular, meaning, mix and match components. I wanted to keep the Bill-of-Materials list low and the cost low as well. There’s no way I can do this solo, I’m hoping to gather a team together and get things rolling.

If you purchase from Slice Engineering mention Brent from Technology Salad, who knows, you might get a discount or a lollipop.

Happy Printing guys!
Brent
Cool work being done here to optimize the Cetus MK printers.
Regarding the upgrade kit has anything been done to address the slop in the x-axis. I have seen videos showing apparent movement in the x-axis if one twists it at the extruder. Seems to be the weakest point?

@glider, So you know…on the Cetus the y-axis is where the extruder exists and the x-axis for the build-platform. The other difference from common 3D printers is the z-axis is reversed, so z0.00 is at the top of the z-axis tower.

The y-axis is the weakest of the three. It’s a bit deceiving because you would think the steel linear-rail would decrease the axial torque across the length of the y-axis. Unfortunately, a fair amount of the promise-of-precision from the use of a linear-rail system on the y-axis is lost due to the use of aluminum extrusion as the mounting-structure for the linear-rail system. Basically, something precise is being mounted to something far less-precise. This type of aluminum extrusion was never meant to provide a backbone for precision linear motion especially when axial forces are at play within a cantilever style printer. Another component, the steel bracket the y-axis assembly is fastened to, does very little to strengthen against the forces of z-axis movement, filament advance, filament retraction and extruder-assembly deceleration… the major forces contributing to the axial deformation of the extrusion over the length of the y-axis. That steel bracket provides for an easy install of the y-axis and it does provide a reasonable foundation for when the extruder assembly is working at the unsupported end of the y-axis, but most of that rigidity is only on the steel bracket side of the aluminum extrusion.

The y-axis on my Cetus is heavily modified, there are 9 mods, the extrusion is milled flat, the steel bracket is milled where the extrusion is seated, 4 mods added to the motor-end, two larger bolts added to fasten the linear rail to the steel bracket and the bolts fastening the linear rail have an equal amount of torque applied. Ideally, the extrusion must go and it will on this Cetus… soon! And no steppers attached to the y-axis!

Cheers

@glider , I should also note the heat-block where it’s mounted by the two ss tubes is quite weak and adds to the slop in the y-axis. To test, the next time you swap-out a nozzle… before you advance the filament into the nozzle… press downward or upwards on the heat-block to simulate the pressure from the extruder-motor advancing and retracting the filament, but don’t press too hard or you could bend/shear the bolts hidden in those two ss tubes, and only test when the heat-block is cold.

Cautionary note: If you decide to perform that test please know you will likely have to re-calibrate the z height by performing the bed-leveling procedure in UpStudio or whichever method you use.

As part of your printers preventative maintenance routine those two bolts inside the ss tubes should be snug. As always, tightening anything other than the nozzle should be done when the printer is at room temperature, there’s a ton of critical aluminum parts. Those two bolts have fine-threads, and if the aluminum heat-block is warm or hotter, the threads in the heat-block will deform and weaken when tightening those two bolts. If you’re not sure of how much to tighten those two bolts install a regular spring lock-washer(not heavy-duty) under the bolt heads, and when tightening… only tighten to the point when the two ends of the lock-washer align and no further.

Cautionary note: Remounting the heat-block is a real pain, seriously, it’s a major hassle to get the ss tubes aligned properly, the bolts need to be located in the middle of the ss tubes so the heat-loss from the heat-block is contained efficiently… three hands recommended.

I’ve read many Cetus owners asking for tech support when they hear the famous extruder thumping when there’s an issue with filament not advancing properly. If you experience the thumping event and depending on the severity of the filament not advancing properly, the heat-block and nozzle assembly will have moved up-and-down and temporarily flexed at those two ss tubes. You might want to check the two bolts that mount the heat-block are still snug.

You might be thinking… well geez… I’ll just get rid of those two ss tubes and the bolts within and mount the heat-block with a beefier chunk of whatever… don’t do it. A neat little package of thermal engineering is at play there and any .::significant changes::. will suck the heat out of the heat-block like crazy. My recommendation: remove the two ss tubes and the bolts, don’t replace with anything in that area and install a stabilizer on the nozzle just above the heat-block as I did earlier in this post. Your print quality will double and it will lower the heat-zone closer to the heat-block and lessen the heat-creep you are most definitely experiencing every time you print … you’ll be on-the-right-path to the benefits of the heat-breaks in the most expensive extruders available today.

Cautionary note: don’t try to tighten anything when the printer is printing and don’t put your tongue on the nozzle 'cause you need the $20 from a dare. Don’t do anything I recommend without careful thought 'cause you will experience a boost in satisfaction, a much higher-quality printed product and spontaneous happier moments every-time a print finishes… 'cause I’ve heard… too much of a good thing can be addicting and I have no idea how to un-addict you.

Cheers

@techsalad, Thank you Brent for your answers!
I can not wait for the mods arrive! You have hyped me up good :smiley:
I have to look in to that Copperhead assembly, i guess there is not a plug and play for the cetus, and i’m severely limited right now on what tools and equipment i can use to manufacture parts and components to make it fit alright. Your speeds at 130+ is out of this world and i would love to reach those speeds with a descent quality.
I look forward to receive the mods and follow you up on your new 3D printer project, it sounds like you have done great research and knows all flaws and benefits in this type of printer and i think you will succeed.

Take care!
Tobias

Hey Brent Ive been following this thread for quite some time and am glad to see the progress. I just saw that you have/had shipped out some of the things you’ve worked on. I was wondering, do you have any photos of the mods you currently have available? And do you have any idea when you’ll be making/shipping out the next batch? Thank!

@sixtynine , Greetings, It’s very satisfying to receive feedback from those reading my works here. Other than the few that have left comments I have no idea if I help others to understand their Cetus printer a little better and if the info allows them to realize what a little gem this printer is if they perform some simple preventative maintenance and stabilize the printer where I’ve indicated weaknesses. Maybe others have seen the mods I’ve posted and were inspired to make their own versions, I’ll never know without feedback :frowning: … so thank-you for letting me know of your interest in my work!

If there’s one thing that always helps me gain some focus over the constant daily pain it’s messages from owners like you mentioning you are following my work, maybe gained some tips and there is more interest in the mods I’ve designed than I know of.

I’m nearing the completion of a batch and will have 5 extra sets of the z-axis stabilizer mod available within 7-10 days. I’ll be posting pics before I start shipping, maybe sooner.

Also planning on posting a YouTube video to show my heavily(mechanically) modified Cetus printing at speeds over 100mm’s per second and the quality of prints at low speed and faster speeds. Who knows, maybe I’ll post a 130mm’s/second video… anyone for 150mm’s/second? Those speeds require a 32bit processor and acceleration/deceleration tweaks for quality in addition to high speed on the Cetus!

Cheers and happy printing!
Brent

@tibberz , Hey Tobias …for some reason I thought I replied to your post, sry for the late reply. Thanks for chiming in, your words most certainly help to boost my pain-endurance and get more time in the shop working to get the mods to you.

The Copperhead increases reliable and consistent quality printing. The heat-break tech almost allows for passive-cooling but a fan is needed for consistent and trouble-free filament delivery. Printing flexible filament is as reliable as printing PLA!

I initially installed a 30mm fan to cool the heat-sink blades. A few days ago I received a few sample fans at 25mm x 7mm from link: AliExpress, they are rated for 5v but you can safely push to 9v 19,500rpm!

I’ll help you install a Copperhead if you decide to add one to your Cetus :smiley:

Cheers and happy printing on your Cetus!
Brent

How is this project going?

I can’t figure out what you guys did to the nozzle to stabilize it, I’ve only added a brace to stiffen the z axis and a noctua 60mm fan.

I’ve tweaked the upstudio 3 to print at 72mms and beyond, but quality poor at any faster than their turbo preset :frowning:

Hi all, Im new here, but have come across a few of your chats. Amazing work! I have clicked on your web link, but it says coming soon? I realise these posts are from a while ago, but it would be lovely to see how far you got with your site and content!