Is there anything that can be done about the blob that gets created at the point a new layer is started/stopped? always leaves a rib along the part…!
Yes. In the material editor, reduce the joint size value.
By…? got any solid tested settings?
There are various settings in Simplify 3D, Cura and Slic3r that help reduce the size. The other solution is to stabilize the nozzle-assembly, y-axis and to a lesser degree the z-axis. The greatest reduction comes when using the above software and hardware stabilizer mods in concert.
I’m close to releasing a nozzle-assembly stabilizer so it does not flex vertically when pushing the filament into the heat-zone within the nozzle and allows retraction to work more efficiently and accurately.
You can read more in the thread “Speed for the Need”
Brent
You can use those softwares with the Cetus? What one have you had best results with?
@onis_uk , I’ve been using Simplify 3D for several years now. I have not experimented with Cura or Slic3r for about a year, maybe less. I chose Simplify3D because a number of features were quicker/easier to setup and change on-the-fly, Simplify3D included features not available in the others at that time.
I would not discount Cura or the others because they are free. If I were to chose again, at this very moment, I would make a list of what features are important to me and rigorously test each one without bias. The one thing always at the top of my list is… ease-of-use… how quickly can I get a model sliced without much fuss.
Hope this helps you!
Cheers,
Brent
Ease of use for me is a high priority, hence why I’ve never strayed from upstudio. I have had a look at others but seems too much bother to try and set up a print. Until I can just click print and it just works then I’m not too fussed!
I found Simplify3D to be more click-print friendly than others, the print-job profiling system is very easy to use, maintain and customize. I have L1(level 1) basic profiles for filament type, then L2 sub-profiles for higher-accuracy and/or higher-speed and L3 sub-profiles for model complexity type.
Within each print-job, at specific layer-heights, I can change to any of the L2 and L3 profiles based on what physical-type of the model is to be printed next. So, let’s say, for the next 40 layers I want to print faster because for that block-of-layers the geometry is less complex…so I’ll click the L2 sub-profile “higher-speed” and the L3 sub-profile “large-diameter round”. Once the round feature of the model is printed I’ll switch back to the previous profile. This micro-managing a print-job may sound complex and time consuming…but… it’s incredulously easy and only a click or two. I also have master profiles for specific models/prototypes I’ve printed so when a similar model is to be printed it truly becomes one-click to print.
Cheers,
Brent
Hello everyone
I wanted to know how you can put a pause inside the gcode to insert for example magnets or bolts
and then start it again.
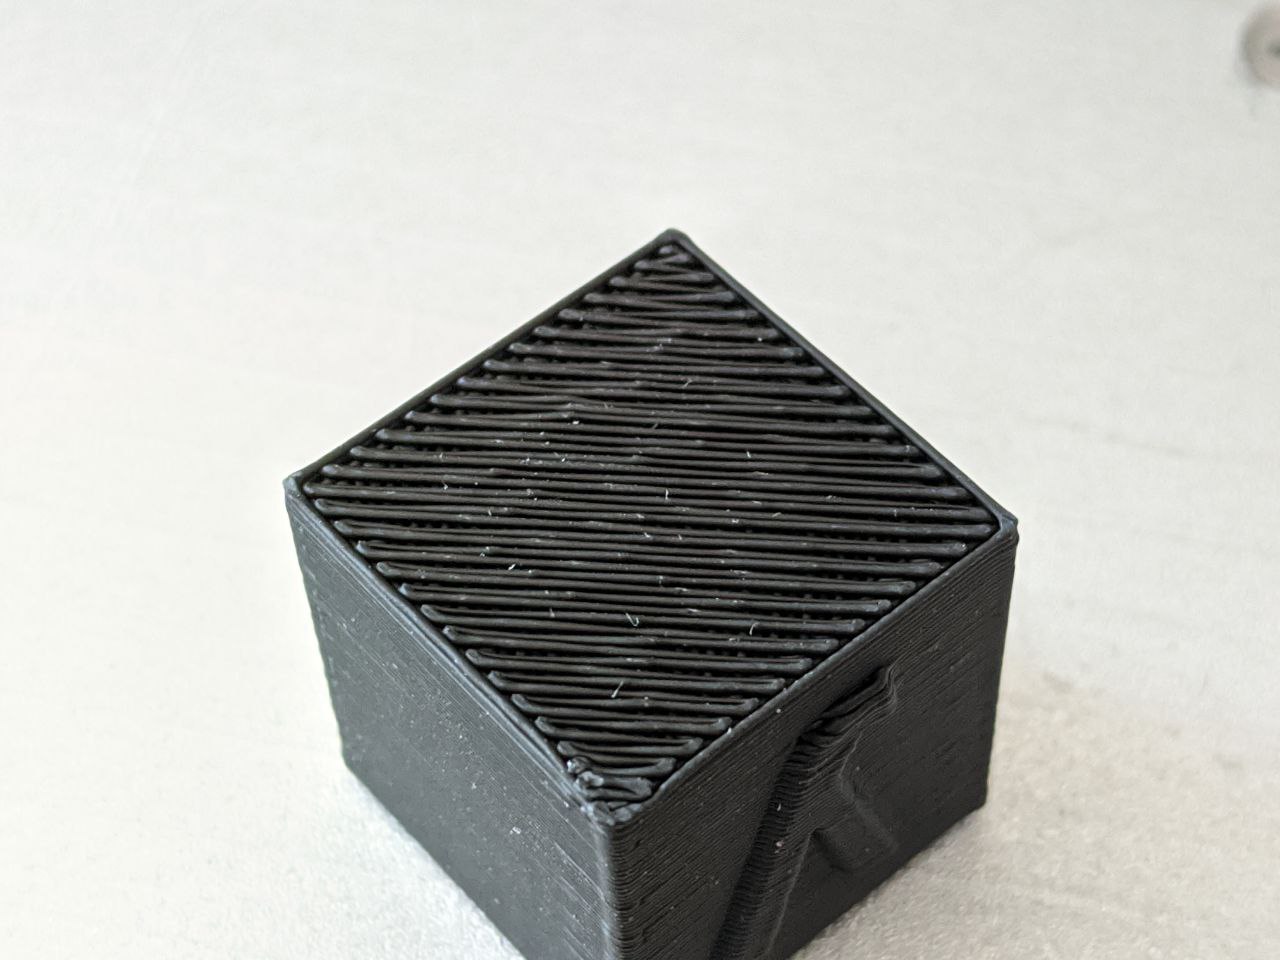
Hey TS, I’ve been trying to calibrate my machine today and I printed out an XZY cube and getting some odd artefacts, the bottom surface looks like a woven texture, and the top surface is very gappy too, Any suggestions?

cant uyou just press the pause button?
@onis_uk , many software settings and of course a z-stabilizer and nozzle stabilizer will give you huge gains in print quality.
To achieve tighter layer-lines the easiest solution is to use a smaller diameter nozzle, this change will immediately lessen the gaps.
You said you are calibrating, the z-axis might not be zero’d to the print-bed, or you may have a z-offset left over from a previous print. When I’m printing to a smooth print-bed without a raft(I don’t use rafts, ever) I leave a .02mm space between the nozzle-tip height and the print-bed within the calibration procedure.
The other thing going on in your pics… when the melted filament is extruded onto the print-bed/model, the shape is too round. The rounded shape is also contributing to the wide gaps The bead of melted filament should have a more flat top and slightly round on the sides, ideally a square bead is the ultimate goal.
The rounded 90deg vertical corners on the cube are due to a number of factors…
Where the layers start/stop, retraction is not working properly which leaves a blob-of-filament when preparing for the next layer-start, an unsecured nozzle assembly(and to a lesser degree the axial torque from the y-axis extrusion) combined with the violent jerk of the z-axis being raised is also contributing to the blob. After the blob is deposited on the outer layer-line, when the nozzle comes around to the layer-start point, where the blob exists, the unsecured nozzle-tip deflects outward around the blob producing that expanded roundness of the corner at the start/stop area, and is more pronounced in comparison to the other 3 vertical corners.
On the other 3 vertical corners, the rounded corners are an amplification of a nozzle assembly not stable enough to make the 90deg corner, there are other reasons too numerous to include here.
Simplify3D has a very nice troubleshooting guide, as well as the other slicers.
Cheers,
Brent
using up studio I can press the pause button, or stop printing at a specific level and then resume.
but what method using S3D or other slicer?
@franco , here’s an article showing how to pause…place something into the print…and resume printing.
Thanks for the information
I read the very interesting article
I’m going to run tests to see my MK3 printer behaving. Hello
sorry if I didn’t give you news before, but I had problems with my mk3.
I did some tests by modifying the g code, in particular I entered M25 (SD press break), the printing stops and waits, but I could not get it started again.
maybe we need another parameter ?
in the list of M codes accepted by cetus I found nothing.
Greetings